Materials needed
- Opaque, flexible plastic bin, approximately 18 x 20 x 15 inches
- Shredded newspaper
- Water
- Compost or soil (a few handfuls)
- Drill with 1/4 inch bit
- Red wiggler worms that are given away by Hanover Master Gardeners or sold in bait shops or over the internet (do not use earthworms)
To make bin
- Drill holes in top of bin and part way down sides.
- Dampen the shredded paper and squeeze out excess moisture (like a sponge with the excess water squeezed out).
- Fill bin with about 12 inches of moist newspaper bedding.
- Mix in a few handfuls of compost or soil.
- Place worms in bin and replace cover.
Maintaining Your Worm Bin
Worm bins take very little effort to maintain, but it is important to make sure that the bin doesn’t become dried out or too wet. They require occasional feeding and temperatures between about 60 and 80 degrees to thrive. The following guidelines can help you maintain ideal conditions for your worms.
- Keep the bin in area where the temperatures are not extreme. Basements and garages work well, but some people also keep them in their kitchens for convenience. A properly maintained worm bin does not smell bad. Since vibrations can disturb them, it is better not to keep them near a refrigerator, for example.
- Feed them vegetable and fruit scraps, pasta, or old food from the refrigerator. They are especially fond of pumpkins, melons, and canned baked beans. Do not put meat, fish, bones or oily/greasy foods in the bin. Never put in dog or cat feces because they can carry parasites. Finally, avoid citrus peels, onions and garlic. Feed worms an average of one Page 2 of 3 How to Make a Worm Bin Edit Date 4/24/18 pound per square foot of bin surface area per week. Don’t worry about leaving home for a few weeks; they will be fine.
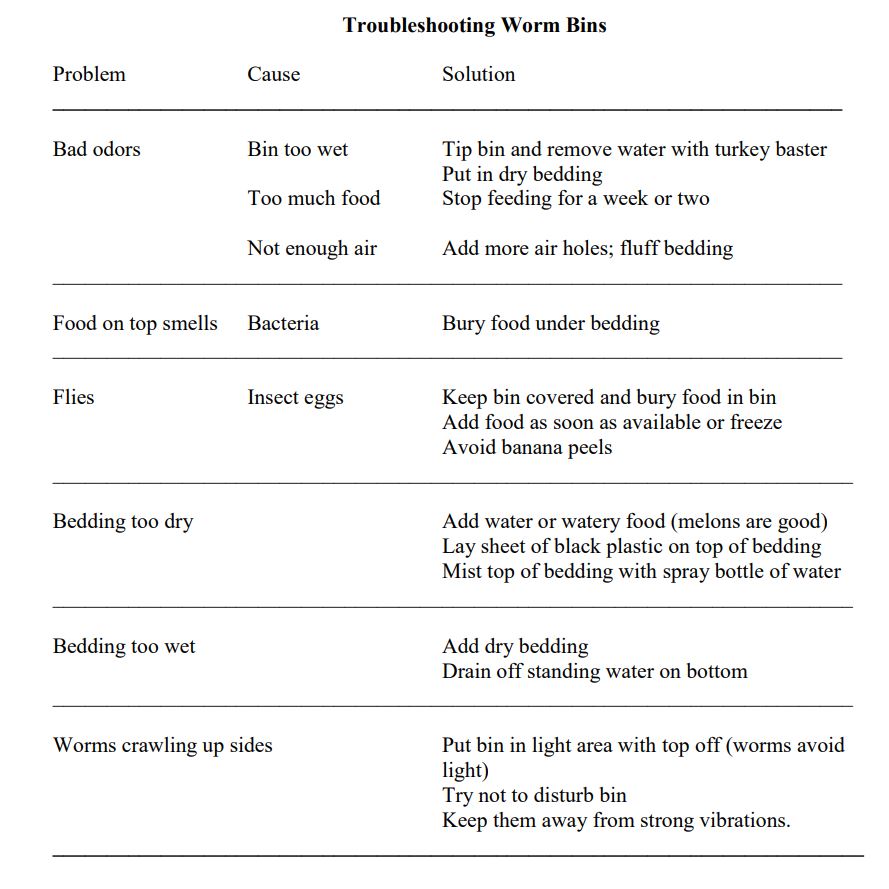
- It is important to maintain the correct moisture level in the bin. The bedding (shredded newspaper) should be just damp enough so that a drop or two of water will come out when squeezed. Don’t let the bedding dry out because worms need 70% moisture to breathe through their skins. On the other hand, don’t allow standing water in the bottom of the bin. (See Troubleshooting below.)

Harvesting Your Vermicompost
There are several methods for harvesting the rich compost (vermicompost) your worms produce. After collecting, particularly if it is very wet, the compost should be allowed to dry out a bit and finish for a month or so in an open bin or container.
Method One
- Dump the contents of the bin onto a large sheet of plastic in a well-lit area.
- Separate compost into small piles. Worms will crawl to the bottom of the piles.
- Moving from pile to pile, take off the top layer of compost and put in a container.
- Continue removing compost until a mass of worms is left at the bottom of the pile.
- Return the worms and remaining compost back to the bin with fresh, moist newspaper bedding.
Method Two
- Move the contents of the bin to one side.
- Put in fresh, moist bedding and food in the other half of the bin. Worms will gradually migrate to the side of the bin with new food and bedding.
- Allow several weeks or more, and then remove the old vermicompost from the bin. Don’t worry if there are a few stray worms left in the old compost.
Uses for Vermicompost
Worms produce a dark compost rich in useful bacteria, fungi, nematodes, enzymes and plant nutrients, which make a wonderful additive for soil. This vermicompost can be used in numerous ways.
- Use in potting soil (10% to 15%).
- Sprinkle lightly in seed beds.
- Place a small amount in the planting hole with transplants.
- Use as top dressing in the garden (1/4 in. layer).

